Manage dependencies with CMake FetchContent for C++ and OpenGL projects
How to setup Visual Studio Code and CMake to automatically handle the dependencies of your OpenGL and C++ projects.
[Disclaimer: If you don’t want to follow the tutorial and directly look at the code, you can find an advanced version on my GitHub]
Over the years I tried to write my own little graphics engine using C++ and OpenGL. To do so I started using GLFW to handle the multi-platform window creation, the input/events management together with other libraries and utilities like glad and glm.
I am admittedly not very good with C++ and especially in dealing with its complex dependency management (or lack of thereof) and the building environment, so I always wanted to have the simplest way to keep my projects in check and manage the libraries and dependencies in the easiest way.
After having spent years doing it “wrong”, first downloading the source files for the libraries and later at least using git submodules to automate their downloads and updates, I found out about CMake and its FetchContent module.
CMake and FetchContent
CMake is a build-system generator that using a Domain System Language (DSL) allows you to describe what and how to build and compile your code. The FetchContent module provides some ways to automatically manage the dependencies of your code, fetching them from other local or remote repositories and defining how to build and integrate them in your code.
CMake is platform and compiler agnostic, it just provides scripts that can be used on several operative systems and can be integrated in your development environment and with your tools. For this reason, it helped me to create projects that can be easily ported and developed on different machines, running MacOSX or Windows without any problem.
By using an IDE like Visual Studio Code, you can leverage several extensions that use your CMake scripts to automatically configure, compile and run your projects.
In this short tutorial I want to show you how I used these tools to quickly set up a C++ project that can be automatically compiled by VSCode with all the needed dependencies fetched from remote GIT repositories.
I start by creating a simple CMakeLists.txt file that contains our settings for CMake in order to generate the build system that VSCode can use to compile the project.
# File: CMakeLists.txt
cmake_minimum_required(VERSION 3.16)

project(cpp-gl-base)

add_subdirectory(deps)

add_executable(${PROJECT_NAME} main.cpp)

target_link_libraries(${PROJECT_NAME} PRIVATE glfw glad glm)
As you can see, after having told which minimum version of CMake to use, I defined the name of my project (cpp-gl-base), told where my dependencies will be listed, which file to compile (main.cpp) and which libraries are needed to be linked with it. Nothing too complicated so far, especially for such a simple situation like this with just one single source file to take care.
The other CMakeLists.txt lives in the deps/ directory mainly for the sake of separating the concerns between the one dedicated to our source files and the one for the dependencies. In theory this content could be pasted instead of the add_subdirectory(deps) and it will work as well.
# File: deps/CMakeLists.txt
include(FetchContent)

# glfw
FetchContent_Declare(
    glfw
    GIT_REPOSITORY https://github.com/glfw/glfw.git
    GIT_TAG 3.4)

FetchContent_MakeAvailable(glfw)

# glad
FetchContent_Declare(
    glad
    GIT_REPOSITORY https://github.com/Dav1dde/glad.git
    GIT_TAG v0.1.36)

FetchContent_MakeAvailable(glad)

# glm
FetchContent_Declare(
    glm
    GIT_REPOSITORY https://github.com/g-truc/glm.git
    GIT_TAG 1.0.1)

FetchContent_MakeAvailable(glm)
Here we start by including the FetchContent module that provides two directives: FetchContent_Declare tells where to get the content to be fetched from and FetchContent_MakeAvailable to add it to the content in your build system.
As you can see in the case of our three libraries, we use a GitHub repository but it can be a local or remote archive or another source control repo. By defining a GIT_TAG we can clamp our dependencies to a specific version, streamlining the stabilization of the codebase and easing any update.
If you want to learn more about this module, you can check the FetchContent Documentation and this CMake Workshop.
The main.cpp
Now that we have created the two CMakeLists.txt files, we can add our source code to the directory and compile our project. You should have a directory structure like this:
  cpp-gl-base/
  ├── deps/
  │   └── CMakeLists.txt
  ├── CMakeLists.text
  └── main.cpp
To test our project with some real C++ and OpenGL code, I took the simple GLFW example on the official library’s documentation and just added a couple of more lines to use glad to load the OpenGL function pointers. The code just inits the framework, instantiates a 640x480 window managed by GLFW, establishes a basic render loop that clear and swap the buffers and listens to input and window events.
// File: src/main.cpp
#include <glad/glad.h>
#include <GLFW/glfw3.h>

int main(void)
{
    GLFWwindow* window;

    /* Initialize the library */
    if (!glfwInit())
        return -1;

    /* Create a windowed mode window and its OpenGL context */
    window = glfwCreateWindow(640, 480, "Hello World", NULL, NULL);
    if (!window)
    {
        glfwTerminate();
        return -1;
    }

    /* Make the window's context current */
    glfwMakeContextCurrent(window);

    /* glad: load all OpenGL function pointers */
    if (!gladLoadGLLoader((GLADloadproc)glfwGetProcAddress))
        return -1;

    /* Loop until the user closes the window */
    while (!glfwWindowShouldClose(window))
    {
        /* Render here */
        glClearColor(0.2f, 0.3f, 0.3f, 1.0f);
        glClear(GL_COLOR_BUFFER_BIT);

        /* Swap front and back buffers */
        glfwSwapBuffers(window);

        /* Poll for and process events */
        glfwPollEvents();
    }

    glfwTerminate();
    return 0;
}
If you want to know more about graphics and game programming, there are plenty of documentation and tutorials on the web to learn game engine development with C++ and OpenGL; my favorite one is LearnOpenGL and it uses GLFW, glad and glm as well.
Visual Studio Code
If you open this project’s directory in Visual Studio Code, it should automatically ask you to download some extensions to manage the CMake workflow for you. Let it install them and VSCode will configure, download and compile the dependencies we listed in our scripts.
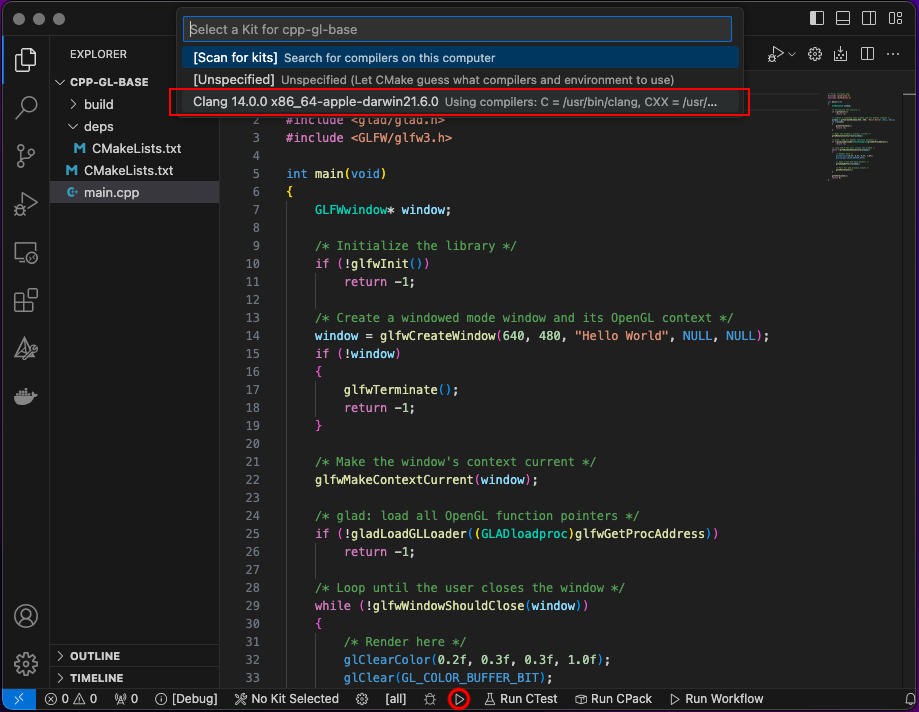
VSCode will ask you to choose a “build kit” and depending on your operative system and configuration, you can choose your compiler of choice. In my case - on a MacBook - I have installed and configured Clang but your mileage may vary.

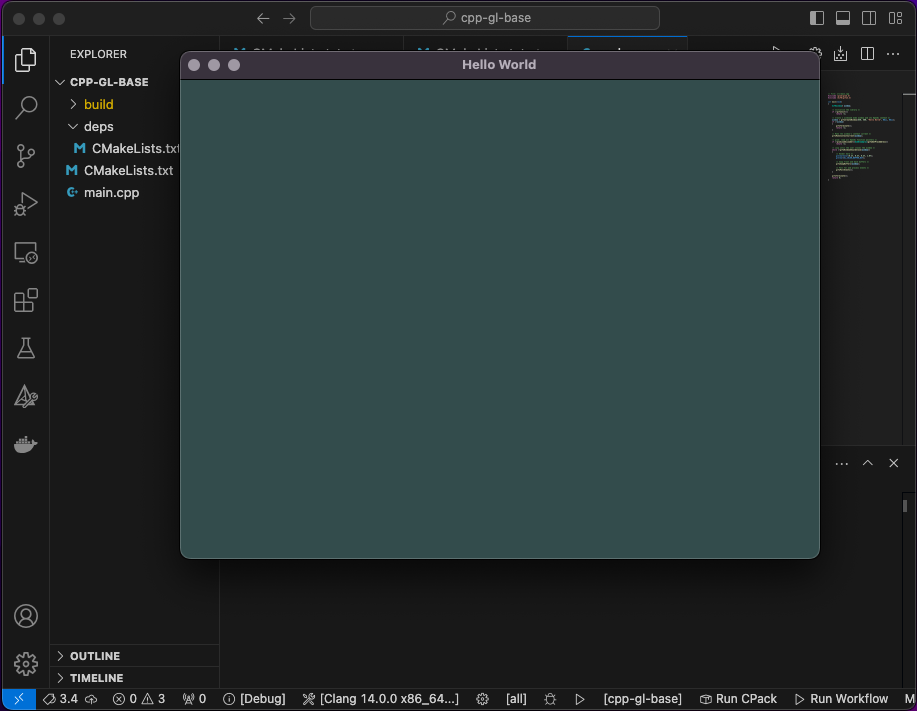
At the bottom of the IDE you will see a “play” button (circled in red on the picture above): by clicking it VSCode will compile your project and launch it, opening the executable and showing you the awesome little “Hello World” OpenGL window ready to display your game.

Conclusions
This little tutorial should just touch the surface of many topics and it is not intended to be an exhaustive guide on how to develop graphical engine or games in C++ and OpenGL. Nevertheless I hope it provides you an entry point to start with a good base and be able to continue your journey with solid foundations when it comes to dependencies management.
I created a repo on GitHub that contains a little more advanced main.cpp code and with more libraries added as dependencies in the CMakeLists.txt file: Assimp for 3D assets importing, stb_image for image loading/decoding from file/memory and FreeType to render text. Check it out if you are interested in seeing the next ideal step after this tutorial!
Thanks for your attention and have fun!
Luca
^Back to top