
Ruby on Rails and Android Authentication Part Three
A Complete Android App with a Rails API Backend
In the previous two parts of the tutorial (first part and second part), you have been guided through the coding of a complete Ruby on Rails backend in part one, that can be used to register and login users through a JSON API that can be consumed by the Android native app we coded in part two.
In this third part of the tutorial I want to further extend the functionalities of our Android app and its Rails backend in order to allow the actual creation and editing of tasks through the exposed API.
Let’s start by securing a bit more the API, then we will proceed to enable the creation of new tasks
Security
Since I posted the tutorial I got some good advices on how to improve the API’s security, for example not passing the auth_token as a GET parameter but in the HTTP Headers.
According to this response to a similar question on the official Devise Support Group, we need to override the params_auth_hash of the TokenAuthenticatable module.
Add the following code to the devise.rb initializer in the config/initializers/ directory, just inside the Devise.setup block (for example at the end, before the closing “end”).
# file: config/initializers/devise.rb
require 'devise/strategies/token_authenticatable'
module Devise
  module Strategies
    class TokenAuthenticatable < Authenticatable
      def params_auth_hash
        return_params = if params[scope].kind_of?(Hash) && params[scope].has_key?(authentication_keys.first)
          params[scope]
        else
          params
        end
        token = ActionController::HttpAuthentication::Token.token_and_options(request)
        return_params.merge!(:auth_token => token[0]) if token
        return_params
      end
    end
  end
end
Having done so it’s now possible to request the tasks to the API passing the auth_token inside the headers. Restart your Rails application and use curl from the command line to retrieve our (fake) tasks:
curl http://localhost:3000/api/v1/tasks.json -H 'Authorization: Token token="N8N5MPqFNdDz3G1jRsC9"'You should receive the hard-coded tasks as usual.
It’s now the turn of our Android app to be modified to send the auth_token as a header when asking the tasks to the API.
To do this I decided to slightly modify the UrlJsonAsyncTask and JsonHelper from the library we used created by Tony Lukasavage.
I forked the original project on GitHub and made the modifications to the code. You can download the forked library here.
I added to the JsonHelper a new parameter - authToken to be passed to the get*FromUrl() methods that will be added to the HTTP Headers in the getStringFromUrl() method:
// file: com.savagelook.android/JsonHelper.java
private static String getStringFromUrl(String url, int connectTimeout, int readTimeout, String authToken)
               throws MalformedURLException, JSONException, IOException {
  URL urlObject = new URL(url);
  HttpURLConnection urlConn = (HttpURLConnection)urlObject.openConnection();
  urlConn.addRequestProperty("Authorization", "Token token=" + authToken);

  // rest of the code ...
}
The auth_token will be passed to the JsonHelper from the modified UrlJsonAsyncTask that has gained a new attribute authToken, with its own getter and setter. We will use the latter in our HomeActivity to pass the saved token our app received and saved in the properties after the login.
To finish up all this changes made to our app, just modify the loadTasksFromAPI() method in the HomeActivity
// file: HomeActivity.java
private void loadTasksFromAPI(String url) {
  GetTasksTask getTasksTask = new GetTasksTask(HomeActivity.this);
  getTasksTask.setMessageLoading("Loading tasks...");
  getTasksTask.setAuthToken(mPreferences.getString("AuthToken", ""));
  getTasksTask.execute(url);
}
As you can see we are not passing the token as a GET parameter in the url but passing it to the GetTasksTask (that is extended from UrlJsonAsyncTask) thanks to the new setter method.
It’s now time to compile the app and test it. Everything should run as before, but now it will be more secure!
A real task
First of all we need to get rid of our fake tasks we setup in the previous tutorial. Let’s start creating a real model for the Task. We just need a title and a completed attributes. I also associate every task to the user who creates it.
rails g model task user_id:integer title:string completed:booleanGenerate the new model and the migration:
# file: db/migrate/<timestamp>_create_tasks.rb
class CreateTasks < ActiveRecord::Migration
  def change
    create_table :tasks do |t|
      t.integer :user_id
      t.string :title
      t.boolean :completed, :default => false

      t.timestamps
    end
  end
end
# file: app/models/task.rb
class Task < ActiveRecord::Base
belongs_to :user
attr_accessible :title
validates_presence_of :title
default_scope order('completed ASC, created_at DESC')
endI added a default scope to order tasks based on the completion status and how old are they. In this way, when we receive them from the API, they are ordered as not completed first, done last and newer on top.
# file: app/models/user.rb
class User < ActiveRecord::Base
  has_many :tasks

  # rest of the code ...
end
Don’t forget to add the has_many association to the User model.
rake db:migrateFinally migrate the database.
Tasks API
To generate the API from our controller we will use the Rabl gem. It’s basically a builder to render JSON views and you can watch a nice screencast by Ryan Bates to learn more about it.
Let’s just add the gem to our Gemfile:
# file: Gemfile
gem 'rabl'
bundle installAnd run the bundle install command to install it. You also should add an initializer to the app to specify that you don’t want to add a root element to the JSON response and the children elements of the API. More info about that can be found in the Railscast linked above and in the official documentation of the Rabl gem.
# file: config/initializers/rabl_config.rb
Rabl.configure do |config|
  config.include_json_root = false
  config.include_child_root =  false
end
Index action
It’s now time to remove our fake index action JSON response from the TasksController and provide some real data to our Android app.
# file: app/controllers/api/v1/tasks_controller.rb
class Api::V1::TasksController < ApplicationController
  skip_before_filter :verify_authenticity_token,
                     :if => Proc.new { |c| c.request.format == 'application/json' }

  before_filter :authenticate_user!

  def index
    @tasks = current_user.tasks
  end
end
The index action is really simple! We just find the tasks associated with the current user, authenticated through the auth_token provided with each request to the API. All the work done so far is finally paying off.
# file: app/views/api/v1/tasks/index.json.rabl
object false
node (:success) { true }
node (:info) { 'ok' }
child :data do
  node (:tasks_count) { @tasks.size }
  child @tasks do
    attributes :id, :title, :created_at, :completed
  end
end
To use Rabl we need to create a new file in the views directory with the “.json.rabl” extension: the first to specify the format that it will provide and the second to use the correct builder.
Rabl, in my opinion, is not so easy to understand at first; but using the documentation and via a trial and error process you can wrap your head around it.
In this view I wanted to provide the same JSON format we faked before and use the same fields of the other part of the API, such as the user registration and authentication.
The object false tells to the Rabl builder we don’t want to map the root-level of the response directly to any object and we construct the nodes freely.
I added two nodes with a success and info information that will be used by the Android app to check if everything is ok with the response and provide a message.
I also added a node with the tasks count that can come in handy.
You can test the real index action through the API with a curl command (the tasks will be empty if you haven’t created any).
curl -v -H 'Content-Type: application/json' -H 'Accept: application/json' -H 'Authorization: Token token="N8N5MPqFNdDz3G1jRsC9"' http://localhost:3000/api/v1/tasks.jsonCreate action
We are now able to requests the list of the tasks for a given user but we still need a way to create a new one. Let’s add the create action to the TasksController.
# file: app/controllers/api/v1/tasks_controller.rb
class Api::V1::TasksController < ApplicationController
  # rest of the code ...

  def create
    @task = current_user.tasks.build(params[:task])
    if @task.save
      @task
    else
      render :status => :unprocessable_entity,
             :json => { :success => false,
                        :info => @task.errors,
                        :data => {} }
    end
  end
end
As you can see we are building the new tasks against the current user tasks and rendering the created object with a Rabl JSON view. If something goes wrong the controller will render directly a response with an error message.
# file: app/views/api/v1/tasks/create.json.rabl
object false
node (:success) { true }
node (:info) { 'Task created!' }
child :data do
  child @task do
    attributes :id, :title, :created_at, :completed
  end
end
The Rabl view is similar to the one we used for the index action: we just render the attributes for a single task and the additional nodes to give some more information about the response.
To finish up this last step, don’t forget to add the new create route to the app routes (the index action was already mapped before).
# file: config/routes.rb
AuthexampleWebapp::Application.routes.draw do

  devise_for :users
  namespace :api do
    namespace :v1 do
      devise_scope :user do
        post 'registrations' => 'registrations#create', :as => 'register'
        post 'sessions' => 'sessions#create', :as => 'login'
        delete 'sessions' => 'sessions#destroy', :as => 'logout'
      end
      get 'tasks' => 'tasks#index', :as => 'tasks'
      post 'tasks' => 'tasks#create'
    end
  end

  ActiveAdmin.routes(self)
  devise_for :admin_users, ActiveAdmin::Devise.config
end
To test the creation of a new task, just use this curl command and watch the response back from the API.
Remember that the auth_token used in these examples are random and provided by my own instance of the app. Use the ones created for your own users, as already specified in the previous part of the tutorial.
curl -v -H 'Content-Type: application/json' -H 'Accept: application/json' -H 'Authorization: Token token="N8N5MPqFNdDz3G1jRsC9"' -X POST http://localhost:3000/api/v1/tasks.json -d "{\"task\":{\"title\":\"A wild new task appears!\"}}"{"success":true,"info":"Task created!","data":{"task":{"id":3,"title":"A wild new task appears!","created_at":"2012-12-02T19:52:22Z","done":false}}}NewTaskActivity
Having completed the coding of the backend end point of the API, it’s now time to add the new feature to the Android app. In order to create a new task, the app should provide a new Activity with a text field and a save button.
This new Activity would be launched from the app action bar/menu, so we need to add a new item to it and catch the click on the new task button. Add the new menu_new_task string to the strings.xml resource file.
<!-- file: res/menu/activity_home.xml -->
<menu xmlns:android="http://schemas.android.com/apk/res/android">
    <item android:id="@+id/menu_new_task"
        android:title="@string/menu_new_task"
        android:orderInCategory="100"
        android:showAsAction="ifRoom" />
    <item android:id="@+id/menu_refresh"
        android:title="@string/menu_refresh"
        android:orderInCategory="100"
        android:showAsAction="ifRoom" />
</menu>
In order to launch the new task Activity, add a new id to the switch case in the onOptionsItemSelected() method of the HomeActivity class. When a user will click on the “New Task”, the NewTaskActivity will be launched.
// file: HomeActivity.java
@Override
public boolean onOptionsItemSelected(MenuItem item) {
  // Handle item selection
  switch (item.getItemId()) {
    case R.id.menu_new_task:
      Intent intent = new Intent(HomeActivity.this, NewTaskActivity.class);
      startActivityForResult(intent, 0);
      return true;
    case R.id.menu_refresh:
      loadTasksFromAPI(TASKS_URL);
      return true;
    default:
      return super.onOptionsItemSelected(item);
  }
}
Having added the additional code to manage the launch of the NewTaskActivity, it’s time to actually create this new activity:
Open the menu File > New > Other ... > Android Activity and name the new file NewTaskActivity.
You can see the code for this new class here:
// file: NewTaskActivity.java
public class NewTaskActivity extends SherlockActivity {

  private final static String CREATE_TASK_ENDPOINT_URL = "http://10.0.2.2:3000/api/v1/tasks.json";
  private SharedPreferences mPreferences;
  private String mTaskTitle;

  @Override
  public void onCreate(Bundle savedInstanceState) {
    super.onCreate(savedInstanceState);
    setContentView(R.layout.activity_new_task);

    mPreferences = getSharedPreferences("CurrentUser", MODE_PRIVATE);
  }

  public void saveTask(View button) {
    EditText taskTitlelField = (EditText) findViewById(R.id.taskTitle);
    mTaskTitle = taskTitlelField.getText().toString();

    if (mTaskTitle.length() == 0) {
      // input fields are empty
      Toast.makeText(this, "Please write something as a title for this task",
          Toast.LENGTH_LONG).show();
      return;
    } else {
      // everything is ok!
      CreateTaskTask createTask = new CreateTaskTask(NewTaskActivity.this);
      createTask.setMessageLoading("Creating new task...");
      createTask.execute(CREATE_TASK_ENDPOINT_URL);
    }
  }

  private class CreateTaskTask extends UrlJsonAsyncTask {
    public CreateTaskTask(Context context) {
      super(context);
    }

    @Override
    protected JSONObject doInBackground(String... urls) {
      DefaultHttpClient client = new DefaultHttpClient();
      HttpPost post = new HttpPost(urls[0]);
      JSONObject holder = new JSONObject();
      JSONObject taskObj = new JSONObject();
      String response = null;
      JSONObject json = new JSONObject();

      try {
        try {
          json.put("success", false);
          json.put("info", "Something went wrong. Retry!");
          taskObj.put("title", mTaskTitle);
          holder.put("task", taskObj);
          StringEntity se = new StringEntity(holder.toString());
          post.setEntity(se);
          post.setHeader("Accept", "application/json");
          post.setHeader("Content-Type", "application/json");
          post.setHeader("Authorization", "Token token=" + mPreferences.getString("AuthToken", ""));

          ResponseHandler<String> responseHandler = new BasicResponseHandler();
          response = client.execute(post, responseHandler);
          json = new JSONObject(response);

        } catch (HttpResponseException e) {
          e.printStackTrace();
          Log.e("ClientProtocol", "" + e);
        } catch (IOException e) {
          e.printStackTrace();
          Log.e("IO", "" + e);
        }
      } catch (JSONException e) {
        e.printStackTrace();
          Log.e("JSON", "" + e);
      }

      return json;
    }

    @Override
      protected void onPostExecute(JSONObject json) {
        try {
          if (json.getBoolean("success")) {
          Intent intent = new Intent(getApplicationContext(), HomeActivity.class);
          startActivity(intent);
          finish();
          }
          Toast.makeText(context, json.getString("info"), Toast.LENGTH_LONG).show();
        } catch (Exception e) {
        Toast.makeText(context, e.getMessage(), Toast.LENGTH_LONG).show();
      } finally {
        super.onPostExecute(json);
      }
    }
  }
}
The Activity is very similar to the RegisterActivity and as you can see the code is almost copied verbatim.
The differences are mainly in the CreateTaskTask class extend from UrlJsonAsyncTask that is called by the saveTask() method when the user click on the save button.
The CreateTaskStak doInBackground() method sets up the JSON request with all the right attributes (the auth_token taken from the SharedPreferences and the value of the text field) and sends them to the API end point.
The onPostExecute method instead close the activity in case of success and launch the HomeActivity again.
The following code is the actual layout used for the NewTaskActivity: it’s a simple EditText field and a Button. Remember to add all the necessary strings to the strings.xml resource file.
<!-- file: res/layout/activity_new_task.xml -->
<?xml version="1.0" encoding="utf-8"?>
<ScrollView xmlns:android="http://schemas.android.com/apk/res/android"
    android:layout_width="match_parent"
    android:layout_height="match_parent" >

    <LinearLayout
        android:layout_width="match_parent"
        android:layout_height="wrap_content"
        android:orientation="vertical"
        android:padding="15dp" >

        <EditText
            android:id="@+id/taskTitle"
            android:layout_width="match_parent"
            android:layout_height="wrap_content"
            android:layout_weight="1"
            android:ems="10"
            android:hint="@string/task_title"
            android:inputType="textMultiLine" >

            <requestFocus />
        </EditText>

        <Button
            android:id="@+id/saveTaskButton"
            android:layout_width="match_parent"
            android:layout_height="wrap_content"
            android:layout_weight="1"
            android:onClick="saveTask"
            android:text="@string/save" />
    </LinearLayout>

</ScrollView>
Finally, before compiling the Android app with the new feature, don’t forget to add to the manifest file the new activity:
<!-- file: AndroidManifest.xml -->
<activity
    android:name=".NewTaskActivity"
    android:label="@string/title_activity_new_task" >
</activity>
If everything goes right in the compiling process, you should see this new shiny activity that will allow you to create new tasks from the Android app directly to the Rails backend, using the improved API we coded earlier.
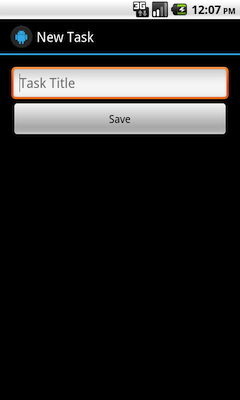
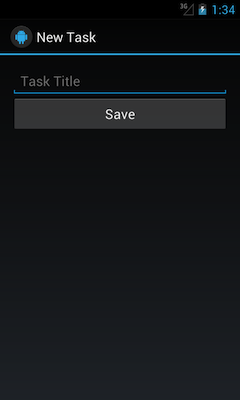
The NewTaskActivity layout (GingerBread 2.3 left and Jelly Bean 4.1 right, with the Sherlock Holo theme)
Completing Tasks: the Rails part
This is the last stretch of this long tutorial, bear with me just for a few lines of code more.
To actually do something with our tasks, we need a way to check them as “completed”. We already have an handy attribute to mark the task but it lacks a method to do so.
Reopen the Rails application and add these two new methods to the Task model.
# file: app/models/task.rb
class Task < ActiveRecord::Base
  # rest of the code ...

  def open!
    update_column(:completed, false)
  end

  def complete!
    update_column(:completed, true)
  end
end
I added non only a method to complete the task but also one to (re)open it: the user of our Android app should be able to check/uncheck his or her tasks.
# file: app/controller/tasks_controller.rb
class Api::V1::TasksController < ApplicationController
  # rest of the code ...

  def open
    @task = current_user.tasks.find(params[:id])
    @task.open!
  rescue ActiveRecord::RecordNotFound
    render :status => 404,
           :json => { :success => false,
                      :info => 'Not Found',
                      :data => {} }
  end

  def complete
    @task = current_user.tasks.find(params[:id])
    @task.complete!
  rescue ActiveRecord::RecordNotFound
    render :status => 404,
           :json => { :success => false,
                      :info => 'Not Found',
                      :data => {} }
  end
end
The two new actions will update the task and render the JSON response back if everything is ok. I added a rescue for the RecordNotFound exception in order to render a proper response for this situation within the API.
Here are the two new views for the open and complete actions.
# file: app/views/api/v1/tasks/open.json.rabl
object false
node (:success) { true }
node (:info) { 'Task opened!' }
child :data do
  child @task do
    attributes :id, :title, :created_at, :completed
  end
end
# file: app/views/api/v1/tasks/complete.json.rabl
object false
node (:success) { true }
node (:info) { 'Task completed!' }
child :data do
child @task do
attributes :id, :title, :created_at, :completed
end
endI’m sure there is room for some refactoring and removal of duplicated code, but I leave this task to you.
# file: config/routes.rb
put 'tasks/:id/open' => 'tasks#open', :as => 'open_task'
put 'tasks/:id/complete' => 'tasks#complete', :as => 'complete_task'
Finally add these two new actions to the routes, inside the :api namespace, after the tasks index route.
You can try the complete action via the API with the usual curl command (provided you have a task already created):
curl -v -H 'Content-Type: application/json' -H 'Accept: application/json' -H 'Authorization: Token token="9DLsDhFhqE8mnRbsPmXw"' -X PUT http://localhost:3000/api/v1/tasks/1/complete.json{"success":true,"info":"Task completed!","data":{"task":{"id":1,"title":"question ","created_at":"2012-12-04T23:17:38Z","completed":true}}}Completing tasks: the Android part
For the last time in this series of tutorials, we need to open Eclipse and make some changes to the code of the Android app.
Open the HomeActivity file and start coding the last lines of code. I add another constant with the url of the tasks “toggle” endpoint of the API. We will add the task id and the required method (open or complete) when we will send the request in another method.
// file: HomeActivity.java
private static final String TOGGLE_TASKS_URL = "http://10.0.2.2:3000/api/v1/tasks/";
Before starting to add the code to actually toggle the completion of a task, we need to refactor some existing methods. When the GetTasksTask class populates the tasks list with the objects retrieved from the API, instead of pushing just the titles of the tasks from the JSON response in an array, the methods populates an ArrayList of Task objects.
The for loop creates the new tasks to be added to the array with the given attributes extracted from the JSON response.
I also changed the way we handle the ListView items, creating a custom Adapter instead of using a normal ArrayAdapter.
Note that I changed the layout for the list items from simple_list_item1 to simple_list_item_checked that uses the CheckedTextView instead of a simple TextView to render the items.
// file: HomeActivity.java
private class GetTasksTask extends UrlJsonAsyncTask {
  public GetTasksTask(Context context) {
    super(context);
  }

  @Override
    protected void onPostExecute(JSONObject json) {
      try {
        JSONArray jsonTasks = json.getJSONObject("data").getJSONArray("tasks");
        JSONObject jsonTask = new JSONObject();
        int length = jsonTasks.length();
        final ArrayList<Task> tasksArray = new ArrayList<Task>(length);

        for (int i = 0; i < length; i++) {
          jsonTask = jsonTasks.getJSONObject(i);
          tasksArray.add(new Task(jsonTask.getLong("id"), jsonTask.getString("title"), jsonTask.getBoolean("completed")));
        }

        ListView tasksListView = (ListView) findViewById (R.id.tasks_list_view);
        if (tasksListView != null) {
          tasksListView.setAdapter(new TaskAdapter(HomeActivity.this,
              android.R.layout.simple_list_item_checked, tasksArray));
        }
      } catch (Exception e) {
      Toast.makeText(context, e.getMessage(), Toast.LENGTH_LONG).show();
    } finally {
      super.onPostExecute(json);
    }
  }
}
The actual code of the Task class is as follow. It’s basically a Java implementation of the Ruby class, with the id, title and completed attributes and their getters and setters.
Just create a new class from the menu File > New > Class and name it Task.
// file: Task.java
public class Task {
  private long id;
  private String title;
  private boolean completed;

  public Task(long id, String title, boolean completed) {
    this.id = id;
    this.title = title;
    this.completed = completed;
  }
  public long getId() {
    return id;
  }
  public void setId(long id) {
    this.id = id;
  }
  public String getTitle() {
    return title;
  }
  public void setTitle(String title) {
    this.title = title;
  }
  public boolean getCompleted() {
    return completed;
  }
  public void setCompleted(boolean completed) {
    this.completed = completed;
  }
}
The code for the custom adapter could be added inside the HomeActivity class file at the end before the closing braket.
More info about adapters can be found in the official documentation.
Particular interest in this code should be noted to the getView() method where it sets the CheckedTextView attributes from the Task:
- the
setText()method uses the task’s title - the
setChecked()method sets the “checked” mark based on the state of the completed attribute of the task - a
onClickListener()is set for the list item (see theonClick()method) - the
setTag()method assigns the task’s id to the tag to grab it when it’s clicked and use it to call the API
The onClick() method simply calls the API based on the checked status of the clicked list item: if it’s checked (e.g. completed) send the request to the “open” action, otherwise to the “complete” one. The url is composed of the constant we set earlier, the task’s id extracted with the getTag() method from the list item and the correct action to call (open or complete).
// file: HomeActivity.java
private class TaskAdapter extends ArrayAdapter<Task> implements OnClickListener {

  private ArrayList<Task> items;
  private int layoutResourceId;

  public TaskAdapter(Context context, int layoutResourceId, ArrayList<Task> items) {
    super(context, layoutResourceId, items);
    this.layoutResourceId = layoutResourceId;
    this.items = items;
  }

  @Override
  public View getView(int position, View convertView, ViewGroup parent) {
    View view = convertView;
      if (view == null) {
        LayoutInflater layoutInflater = (LayoutInflater) getSystemService(Context.LAYOUT_INFLATER_SERVICE);
        view = (CheckedTextView) layoutInflater.inflate(layoutResourceId, null);
      }
      Task task = items.get(position);
      if (task != null) {
        CheckedTextView taskCheckedTextView = (CheckedTextView) view.findViewById(android.R.id.text1);
          if (taskCheckedTextView != null) {
            taskCheckedTextView.setText(task.getTitle());
            taskCheckedTextView.setChecked(task.getCompleted());
            taskCheckedTextView.setOnClickListener(this);
          }
          view.setTag(task.getId());
      }
      return view;
  }

  @Override
  public void onClick(View view) {
    CheckedTextView taskCheckedTextView = (CheckedTextView) view.findViewById(android.R.id.text1);
    if (taskCheckedTextView.isChecked()) {
      taskCheckedTextView.setChecked(false);
      toggleTasksWithAPI(TOGGLE_TASKS_URL + view.getTag() + "/open.json");
    } else {
      taskCheckedTextView.setChecked(true);
      toggleTasksWithAPI(TOGGLE_TASKS_URL + view.getTag() + "/complete.json");
    }
  }
}
The toggleTasksWithAPI() method is very simple and it just instantiates another class extended from the UrlJsonAsyncTask and sets the title for the dialog and calls the execute method with the provided url as we have seen above.
// file: HomeActivity.java
private void toggleTasksWithAPI(String url) {
  ToggleTaskTask completeTasksTask = new ToggleTaskTask(HomeActivity.this);
  completeTasksTask.setMessageLoading("Updating task...");
  completeTasksTask.execute(url);
}
We are almost there! The last class we need to add to the HomeActivity is the aforementioned ToggleTaskTask. As you can see it’s very similar to the RegisterTask we coded in the previous part: it setups the json request with the correct headers with the auth token and executes.
Note that we are using the HttpPut class instead of the HttpPost one because our API responds to the PUT http verb for the open and complete actions.
The onPostExecute() method just shows a Toast with the success or error message coming from the API.
// file: HomeActivity.java
private class ToggleTaskTask extends UrlJsonAsyncTask {
  public ToggleTaskTask(Context context) {
    super(context);
  }

  @Override
  protected JSONObject doInBackground(String... urls) {
    DefaultHttpClient client = new DefaultHttpClient();
    HttpPut put = new HttpPut(urls[0]);
    String response = null;
    JSONObject json = new JSONObject();

    try {
      try {
        json.put("success", false);
        json.put("info", "Something went wrong. Retry!");
        put.setHeader("Accept", "application/json");
        put.setHeader("Content-Type", "application/json");
        put.setHeader("Authorization", "Token token=" + mPreferences.getString("AuthToken", ""));

        ResponseHandler<String> responseHandler = new BasicResponseHandler();
        response = client.execute(put, responseHandler);
        json = new JSONObject(response);

      } catch (HttpResponseException e) {
        e.printStackTrace();
            Log.e("ClientProtocol", "" + e);
      } catch (IOException e) {
        e.printStackTrace();
            Log.e("IO", "" + e);
      }
    } catch (JSONException e) {
      e.printStackTrace();
        Log.e("JSON", "" + e);
    }

    return json;
  }

  @Override
    protected void onPostExecute(JSONObject json) {
      try {
        Toast.makeText(context, json.getString("info"), Toast.LENGTH_LONG).show();
      } catch (Exception e) {
        Toast.makeText(context, e.getMessage(), Toast.LENGTH_LONG).show();
      } finally {
        super.onPostExecute(json);
      }
    }
  }
}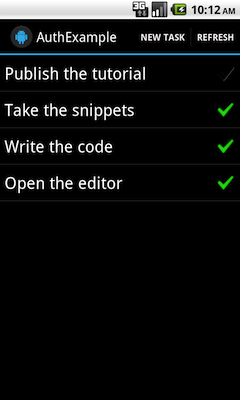
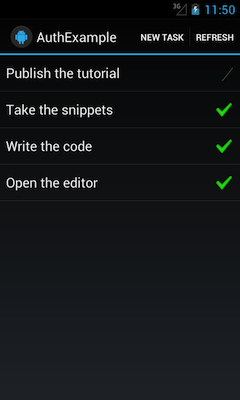
The HomeActivity with some real tasks and checked marks (GingerBread 2.3 left and Jelly Bean 4.1 right, with the Sherlock Holo theme)
Conclusion
We made it!
It’s time to compile the app, fire up the Rails app (or push it to your server or to Heroku, if you followed the previous tutorial advice) and try it out. If everything went fine you should be able to register and login a user, create new tasks and mark them as completed, all by using a secure API exposed from your Rails application.
I think that by following every steps in this series of tutorials you will be able to build both the Rails backend and the Android app, but I know that it’s easier to look at the code when it’s already completed and not split in snippets. So in the next few days I will push the two applications to GitHub so you can read the code from there or directly clone it on your local development machine.
I know that the code isn’t the best you could write, but it’s working and I believe that it’s a good starting point for a newbie. I wrote these tutorials as the tutorials I wished I had when I started coding these kind of topics, so I hope you will find them useful.
For every question or doubt, just leave a comment below. If you need to contact me directly, you can do it by sending an email to luca.tironi@gmail.com
Thanks for all the patience and enjoy!
Luca
^Back to top