
Ruby on Rails and RubyMotion Authentication Part One
A Complete iOS App with a Rails API backend
UPDATED on May 15th: fixed session storage bug, some typos and some small changes according to the 2.0 release of Rubymotion.
Hi all and welcome back in 2013. In the first three tutorials (part one, two and three) I walked you through the developing of a complete Android app backed by a web application in Ruby on Rails and communicating via a JSON API.
With this new series of two tutorials I want to help you develop an iOS app using the same Rails API coded in the first tutorials. The iOS app will use the RubyMotion toolchain that allows to create native app using the Ruby language instead of Objective-C.
RubyMotion isn’t free though, it costs $199.99 (€159,37) for a single license but I can assure you that it’s worth the price if you don’t plan to learn Objective-C or you want to use Ruby to develop apps for the iPhone and the iPad.
I advise to read the nice getting started tutorial written by Clay Allsopp, one of the most active developers of the RubyMotion community.
In order to start a new project, just open the Terminal in a directory of your choice and write:
motion create AuthExample
cd AuthExample
If you have read the previous tutorials you already knows what our app should do: send POST and GET HTTP requests with JSON attributes to the register/login authentication endpoint. To do so we’ll need to create some controllers to display the register and login forms.
To start the coding of our Rubymotion app, let’s have a look to the config/make file that will compile and launch the app in the iOS simulator: the Rakefile. If you need some more information on what rake is and can do, go to the official documentation.
A small change to the Authentication API
Before we can start, we have to make some changes in the Ruby on Rails application in order to remove the session caching using Warden. We must do so because iOS uses the sessions (if they’re present in the HTTP response headers) and it messes up the authentication with the API (ie: you still keep the same authenticated user even if you logout and login with another one).
To avoid this, edit the Devise initializer and add the :token_auth to the skip_session_storage array and add :store => false to the warden.authenticate! parameters used in the create and destoy methods in the Api::V1::SessionsController and the sign_in method call in the API::V1::RegistrationsController:
# file: config/initializers/devise.rb
  # By default Devise will store the user in session. You can skip storage for
  # :http_auth and :token_auth by adding those symbols to the array below.
  # Notice that if you are skipping storage for all authentication paths, you
  # may want to disable generating routes to Devise's sessions controller by
  # passing :skip => :sessions to `devise_for` in your config/routes.rb
  config.skip_session_storage = [:http_auth, :token_auth]
# file: app/controllers/api/v1/registrations_controller.rb
class Api::V1::RegistrationsController < Devise::RegistrationsController
# Other code
def create
build_resource
resource.skip_confirmation!
if resource.save
sign_in(resource, :store => false)
render :status => 200,
:json => { :success => true,
:info => "Registered",
:data => { :user => resource,
:auth_token => current_user.authentication_token } }
else
render :status => :unprocessable_entity,
:json => { :success => false,
:info => resource.errors,
:data => {} }
end
end
end# file: app/controllers/api/v1/sessions_controller.rb
class Api::V1::SessionsController < Devise::SessionsController
# Other code
def create
warden.authenticate!(:scope => resource_name, :store => false, :recall => "#{controller_path}#failure")
render :status => 200,
:json => { :success => true,
:info => "Logged in",
:data => { :auth_token => current_user.authentication_token } }
end
def destroy
warden.authenticate!(:scope => resource_name, :store => false, :recall => "#{controller_path}#failure")
current_user.reset_authentication_token!
render :status => 200,
:json => { :success => true,
:info => "Logged out",
:data => {} }
end
# Other code
endThe Rakefile: configuration and dependencies
I will use some cool features provided by BubbleWrap like the App::Persistence helper that wraps NSUserDefaults, BW::JSON for JSON encoding and parsing and BW::HTTP that wraps NSURLRequest, NSURLConnection in order to communicate with our Rails API. BubbleWrap provides a ruby-like interface to common Cocoa and iOS APIs: go and check out the documentation if you want learn some more.
UPDATE May 15th: I decided to start using Bundler. For more information on why, check this useful guide.
To use BubbleWrap just open the Terminal and install the bundler gem:
gem install bundlerThen create a new file called Gemfile in the root directory of the project.
# file Gemfile
source :rubygems

gem 'bubble-wrap', '1.3.0.osx'
gem 'motion-cocoapods'
And finally use Bundler to install the gem(s) you specify in the Gemfile:
bundle installLet’s now setup the RubyMotion app’s Rakefile with all our dependencies and configurations:
# file Rakefile
# -*- coding: utf-8 -*-
$:.unshift("/Library/RubyMotion/lib")

require 'motion/project/template/ios'
require 'bundler'
Bundler.require

Motion::Project::App.setup do |app|
  # Use `rake config' to see complete project settings.
  app.name = 'AuthExample'
  app.identifier = 'com.example.authexample'
  app.device_family = :iphone
  app.interface_orientations = [:portrait]

  # PODS
  app.pods do
    pod 'SVProgressHUD'
  end
end
These few lines should be auto-explicatory, but they basically tells to our building system what are the dependencies and the basic configuration for our app. You can find more information on the official ‘hello motion’ tutorial.
The app’s starting point, the App Delegate
The core of every iOS app is the App Delegate: it’s a custom object created at app launch time with the primary job of handling state transitions within the app. More information on the iOS application architecture can be found on the official documentation.
# file app/app_delegate.rb
class AppDelegate

  def application(application, didFinishLaunchingWithOptions:launchOptions)
    @window = UIWindow.alloc.initWithFrame(UIScreen.mainScreen.bounds)

    @navigationController = UINavigationController.alloc.init
    @navigationController.pushViewController(TasksListController.controller,
                                             animated:false)

    @window.rootViewController = @navigationController
    @window.makeKeyAndVisible

    if App::Persistence['authToken'].nil?
      showWelcomeController
    end

    return true
  end

  def showWelcomeController
    @welcomeController = WelcomeController.alloc.init
    @welcomeNavigationController = UINavigationController.alloc.init
    @welcomeNavigationController.pushViewController(@welcomeController, animated:false)

    TasksListController.controller.presentModalViewController(@welcomeNavigationController,
                                                              animated:true)
  end

end
In this simple app we just define the application:didFinishLaunchingWithOptions and an auxiliary method that shows a modal window with the Welcome view.
The method application:didFinishLaunchingWithOptions creates a new window from the class UIWindow to contain the main UINavigationController in which the TaskListController is pushed on top of the stack and set it as the root controller of the window.
It then checks if there’s an authToken key already present within the App::Persistence interface: if it’s not there that means that the user isn’t logged in yet and so the welcome screen with the choice between login and register has to be diplayed, calling the showWelcomeController method defined below.
The first controller
This is the main entry point of the application: it’s a simple controller that will show just a text label and two button, each one pushing another controller on the stack.
I used some simple geometry trick to place te buttons accordingly to the phone screen’s dimensions, nothing fancy. You can see the end result after the block of code.
# file app/controllers/WelcomeController.rb
class WelcomeController < UIViewController

  def self.controller
    @controller ||= WelcomeController.alloc.initWithNibName(nil, bundle:nil)
  end

  def viewDidLoad
    super

    self.title = "Welcome"
    self.view.backgroundColor = UIColor.whiteColor

    @containerView = UIView.alloc.initWithFrame([[0, 50], [self.view.frame.size.width, 100]])

    @welcomeTitleLabel = UILabel.alloc.initWithFrame([[10, 10], [self.view.frame.size.width - 20, 20]])
    @welcomeTitleLabel.font = UIFont.boldSystemFontOfSize(20)
    @welcomeTitleLabel.text = 'Welcome to the App!'

    @containerView.addSubview(@welcomeTitleLabel)

    @welcomeLabel = UILabel.alloc.initWithFrame([[10, 35], [self.view.frame.size.width - 20, 20]])
    @welcomeLabel.text = 'Please select an option to start using it!'

    @containerView.addSubview(@welcomeLabel)

    @registerButton = UIButton.buttonWithType(UIButtonTypeRoundedRect)
    @registerButton.frame = [[10, 65], [(self.view.frame.size.width  / 2) - 15, 40]]
    @registerButton.setTitle('Register', forState: UIControlStateNormal)
    @registerButton.addTarget(self,
                              action:'register',
                              forControlEvents:UIControlEventTouchUpInside)

    @containerView.addSubview(@registerButton)

    @loginButton = UIButton.buttonWithType(UIButtonTypeRoundedRect)
    @loginButton.frame = [[(self.view.frame.size.width  / 2) + 5, 65], [(self.view.frame.size.width  / 2) - 15, 40]]
    @loginButton.setTitle('Login', forState: UIControlStateNormal)
    @loginButton.addTarget(self,
                           action:'login',
                           forControlEvents:UIControlEventTouchUpInside)

    @containerView.addSubview(@loginButton)

    # Finally add the scrollview to the main view
    self.view.addSubview(@containerView)
  end

  def register
    @registerController = RegisterController.alloc.init
    self.navigationController.pushViewController(@registerController, animated:true)
  end

  def login
    @loginController = LoginController.alloc.init
    self.navigationController.pushViewController(@loginController, animated:true)
  end
end
There are just two extra methods that will be called when the user touch the buttons: each one of them creates a new controller for the user registration and login and pushes it on the stack of its own UINavigationController.
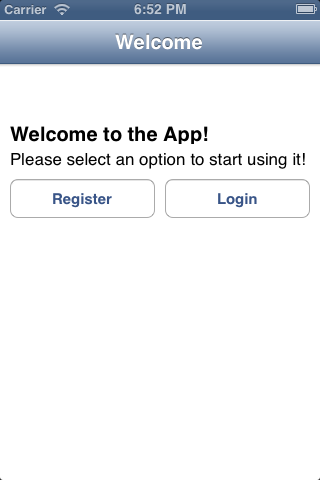
The WelcomeController
Create a new user account and log users in
Until now we covered some pretty basic stuff. It’s time to do some more and delve into the cool aspects of Rubymotion.
Install Formotion
In order to ease the creation of interfaces with user input forms, I will use Formotion by the great Clay Allsopp: it provides a simple “ruby-fu” approach to populate your forms with every type of inputs iOS could provide.
To install it, add the Formotion gem to the Gemfile and open the Terminal and install the Formotion gem.
# file Gemfile
# other code
gem 'formotion'
bundle installRegisterContoller
The first controller we are going to create is the RegisterController: it displays the mandatory fields for the creation of a new user and sends them to the API authentication endpoint to validate them and return a valid authentication token.
The code should be self explanatory, but just to have an overview the entry point is the init method: a new Formotion::Form is created with a dictonary defining the structure of the fields. The method called when the user submits the form is added to the on_submit block and the form is finally initialized.
For more information on the Formotion DSL, check the official documentation.
# file app/controllers/RegisterController.rb
class RegisterController < Formotion::FormController
  API_REGISTER_ENDPOINT = "http://localhost:3000/api/v1/registrations.json"

  def init
    form = Formotion::Form.new({
      sections: [{
        rows: [{
          title: "Email",
          key: :email,
          placeholder: "me@mail.com",
          type: :email,
          auto_correction: :no,
          auto_capitalization: :none
        }, {
          title: "Username",
          key: :name,
          placeholder: "choose a name",
          type: :string,
          auto_correction: :no,
          auto_capitalization: :none
        }, {
          title: "Password",
          key: :password,
          placeholder: "required",
          type: :string,
          secure: true
        }, {
          title: "Confirm Password",
          key: :password_confirmation,
          placeholder: "required",
          type: :string,
          secure: true
        }],
      }, {
        title: "Your email address will always remain private.\nBy clicking Register you are indicating that you have read and agreed to the terms of service",
        rows: [{
          title: "Register",
          type: :submit,
        }]
      }]
    })
    form.on_submit do
      self.register
    end
    super.initWithForm(form)
  end

  def viewDidLoad
    super

    self.title = "Register"
  end

  def register
    headers = { 'Content-Type' => 'application/json' }
    data = BW::JSON.generate({ user: {
                                 email: form.render[:email],
                                 name: form.render[:name],
                                 password: form.render[:password],
                                 password_confirmation: form.render[:password_confirmation]
                                } })

    if form.render[:email].nil? ||
       form.render[:name].nil? ||
       form.render[:password].nil? ||
       form.render[:password_confirmation].nil?
      App.alert("Please complete all the fields")
    else
      if form.render[:password] != form.render[:password_confirmation]
        App.alert("Your password doesn't match confirmation, check again")
      else
        SVProgressHUD.showWithStatus("Registering new account...", maskType:SVProgressHUDMaskTypeGradient)
        BW::HTTP.post(API_REGISTER_ENDPOINT, { headers: headers , payload: data } ) do |response|
          if response.status_description.nil?
            App.alert(response.error_message)
          else
            if response.ok?
              json = BW::JSON.parse(response.body.to_str)
              App::Persistence['authToken'] = json['data']['auth_token']
              App.alert(json['info'])
              self.navigationController.dismissModalViewControllerAnimated(true)
              TasksListController.controller.refresh
            elsif response.status_code.to_s =~ /40\d/
              App.alert("Registration failed")
            else
              App.alert(response.to_str)
            end
          end
          SVProgressHUD.dismiss
        end
      end
    end
  end
end
The other important method of this controller is the register one that is called on submit. As you can see it sets the correct content type in the HTTP headers and compile te JSON object containing the value from the fields using the form.render[:name_of_the_field] method.
Before actually sending the JSON request to the API, we check if all the required fields have been compiled and if the password and the password confirmation are the same, displaying an alert informing the user if they are not.
If everything is fine, it’s time to use the BubbleWrap’s BW::HTTP.post method to send the HTTP request to the Rails application: before doing so though I will use SVProgressHUD in order to show a nice “loading” alert to give some feedback to the user. The SVProgressHUD is a simple Cocoa library that we actually added using (Motion) CocoaPods in the Rakefile. More info could be found in the Motion CocoaPods documentation.
Inside the BW::HTTP.post block we check if the response is ok or ko, displaying an alert iforming the user if something went wrong. If the response is ok, we use the BW::JSON.parse method to parse the response and retrieve the auth_token for the brand new user, saving it in the persistence key-value store.
Finally the whole navigation controller that contains this and the WelcomeController is dismissed and the TasksListController.controller.refresh is called to actually retrieve the user’s tasks. More infor about that later.
LoginController
The LoginController is actually really similar to the register one. It uses Formotion to setup the form fields and the login method sends the data to the JSON API, providing feedback if something has gone wrong or the credentials aren’t valid.
The most important thing is that - if the authentication with the backend is succesful - we save the auth_token contained in the API response in the App::Persistence store.
# file app/controllers/LoginController.rb
class LoginController < Formotion::FormController
  API_LOGIN_ENDPOINT = "http://localhost:3000/api/v1/sessions.json"

  def init
    form = Formotion::Form.new({
      sections: [{
        rows: [{
          title: "Email",
          key: :email,
          placeholder: "me@mail.com",
          type: :email,
          auto_correction: :no,
          auto_capitalization: :none
        }, {
          title: "Password",
          key: :password,
          placeholder: "required",
          type: :string,
          secure: true
        }],
      }, {
        rows: [{
          title: "Login",
          type: :submit,
        }]
      }]
    })
    form.on_submit do
      self.login
    end
    super.initWithForm(form)
  end

  def viewDidLoad
    super

    self.title = "Login"
  end

  def login
    headers = { 'Content-Type' => 'application/json' }
    data = BW::JSON.generate({ user: {
                                 email: form.render[:email],
                                 password: form.render[:password]
                                } })

    SVProgressHUD.showWithStatus("Logging in", maskType:SVProgressHUDMaskTypeGradient)
    BW::HTTP.post(API_LOGIN_ENDPOINT, { headers: headers, payload: data } ) do |response|
      if response.status_description.nil?
        App.alert(response.error_message)
      else
        if response.ok?
          json = BW::JSON.parse(response.body.to_str)
          App::Persistence['authToken'] = json['data']['auth_token']
          App.alert(json['info'])
          self.navigationController.dismissModalViewControllerAnimated(true)
          TasksListController.controller.refresh
        elsif response.status_code.to_s =~ /40\d/
          App.alert("Login failed")
        else
          App.alert(response.to_str)
        end
      end
      SVProgressHUD.dismiss
    end
  end
end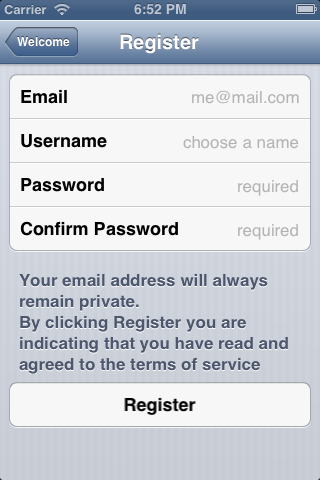
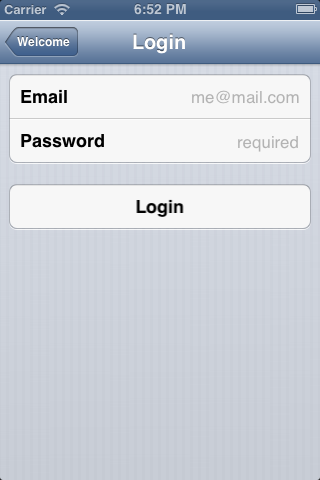
The RegisterController and LoginController
TasksListController
Finally we come to the main view of our app: the Tasks list. First though, we need to setup a simple object to store our tasks retrieved from the API and interact with them within our iOS application.
For this first part of the tutorial, the TaskController is just a placeholder for the completion of the authentication process and that will hold the functional logout button, more will be added in the next part.
# file app/controllers/TasksListController.rb
class TasksListController < UIViewController

  def self.controller
    @controller ||= TasksListController.alloc.initWithNibName(nil, bundle:nil)
  end

  def viewDidLoad
    super

    self.title = "Tasks"
    self.view.backgroundColor = UIColor.whiteColor

    logoutButton = UIBarButtonItem.alloc.initWithTitle("Logout",
                                                       style:UIBarButtonItemStylePlain,
                                                       target:self,
                                                       action:'logout')
    self.navigationItem.leftBarButtonItem = logoutButton

    refreshButton = UIBarButtonItem.alloc.initWithBarButtonSystemItem(UIBarButtonSystemItemRefresh,
                                                                      target:self,
                                                                      action:'refresh')
    self.navigationItem.rightBarButtonItem = refreshButton
  end

  def refresh
  end

  def logout
    UIApplication.sharedApplication.delegate.logout
  end
end
In order to make the logout work, we need to add the logout method to the AppDelegate class: it uses the BW::HTTP.delete method to send a reset of the authentication token to the API and deleting the local value in the Persistence store.
Finally calls the showWelcomeController method to let the user choose if he/she wants to login again or register a new user.
# file app/app_delegate.rb
class AppDelegate
  # Other code

  def logout
    headers = {
      'Content-Type' => 'application/json',
      'Authorization' => "Token token=\"#{App::Persistence['authToken']}\""
    }

    BW::HTTP.delete("http://localhost:3000/api/v1/sessions.json", { headers: headers }) do |response|
      App::Persistence['authToken'] = nil
      showWelcomeController
    end
  end
end
Conclusion
If you haven’t done it yet, launch the app with the rake command and see it in action in the simulator:
rakeThat’s it for now! I will post the second part of this tutorial soon: it will feature the completion of this ToDo app in order to get the list of user’s tasks from the backend, the creation of new tasks and their flagging as “completed”.
For any question, just like always, write a comment below or send me an email to luca.tironi@gmail.com.
I hope you enjoyed this tutorial and it was helpful for your projects. Have fun and see you soon!
Luca
^Back to top